Welcome to your go-to guide for using concrete for pavers in NZ. Whether you’re upgrading your driveway, laying a new patio, or planning a garden path, choosing the right concrete can make all the difference. With so many options available, plain, coloured, exposed aggregate, and more, it’s easy to feel overwhelmed. This post breaks down everything you need to know in simple terms, from types of concrete and preparation tips to cost breakdowns and maintenance advice. If you’re after a smooth, durable, and weather-ready surface that stands up to New Zealand’s conditions, you’re in the right place.
The best concrete for pavers in NZ includes plain concrete for basic jobs, exposed aggregate for texture and grip, and coloured concrete for visual appeal. These options suit New Zealand’s weather, offer durability, and work well for driveways, patios, and paths. Always choose a mix that matches your site’s load, drainage, and climate needs.
Table of Contents
Why Use Concrete For Pavers?
Concrete is one of the most reliable materials for paving in New Zealand, and for good reason. Whether you’re working on a residential driveway or a backyard patio, concrete offers the strength, flexibility, and durability needed to handle local conditions. Below, we’ll break down the key reasons why more Kiwis are choosing concrete for their paving projects.
Strength And Durability
New Zealand’s climate can be unpredictable, with rain, frost, and strong UV exposure common across many regions. Concrete is built to withstand all of it. Unlike other materials that shift or break down over time, a properly laid concrete base holds steady under pressure. It doesn’t sink easily, handles heavy loads like vehicles, and resists cracking when installed correctly with a good sub-base and expansion joints. If you’re after a surface that lasts for decades with minimal fuss, concrete delivers.
Cost-Effectiveness Over Time
While the upfront cost of concrete might seem higher than some materials, the long-term savings are hard to ignore. Concrete requires very little upkeep. Once sealed, it resists stains, weeds, moss, and moisture damage. You won’t need to reset or replace sections every few years like with some other paving options. For homeowners thinking long-term, this translates into fewer repairs and more peace of mind.
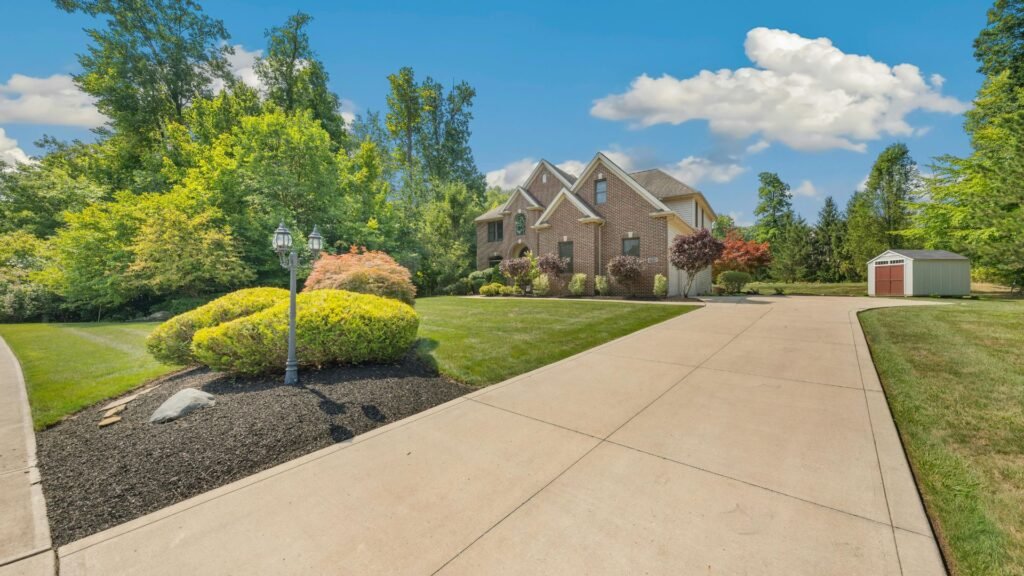
Versatility For Different Areas
Concrete works across many types of spaces, from small garden paths to large driveways and even outdoor entertainment zones. You can pour it as a smooth slab, texture it for grip, or color it to match your home’s design. Stamped concrete can mimic the look of natural stone or tiles without the added cost or labor. This makes it ideal for a range of settings, whether you’re designing a sleek modern patio or a rustic walkway.
Eco Considerations
Concrete may not sound like the most eco-conscious option, but that’s changing. More suppliers in NZ now offer mixes that use recycled materials like crushed concrete or fly ash. Permeable concrete is also available, which helps reduce water runoff by allowing rain to pass through the surface into the ground. These improvements make it easier to meet local building standards while doing your part for the environment.
How Concrete Compares To Other Paving Materials
Here’s a quick look at how concrete stacks up against other common paving options:
- Gravel: Cheaper upfront, but shifts easily, requires frequent raking, and isn’t ideal for high-traffic areas.
- Asphalt: Good for driveways but softens in heat, needs resealing often, and doesn’t offer aesthetic variety.
- Bricks: Attractive and modular b,ut can loosen over time, attract weeds, and may require ongoing alignment and cleaning.
When you weigh the long-term benefits, concrete stands out as a practical and durable choice for NZ homes. Whether you want functionality, style, or both, it’s a paving material that ticks all the boxes.

Types Of Concrete Used For Pavers In NZ
Choosing the right type of concrete for your pavers is key to a long-lasting and visually appealing surface. In New Zealand, the climate and terrain vary from region to region, so selecting a concrete type that suits your environment and project goals is essential. Below are the most common concrete options used for paving across NZ, each with its own strengths, look, and best-use scenarios.
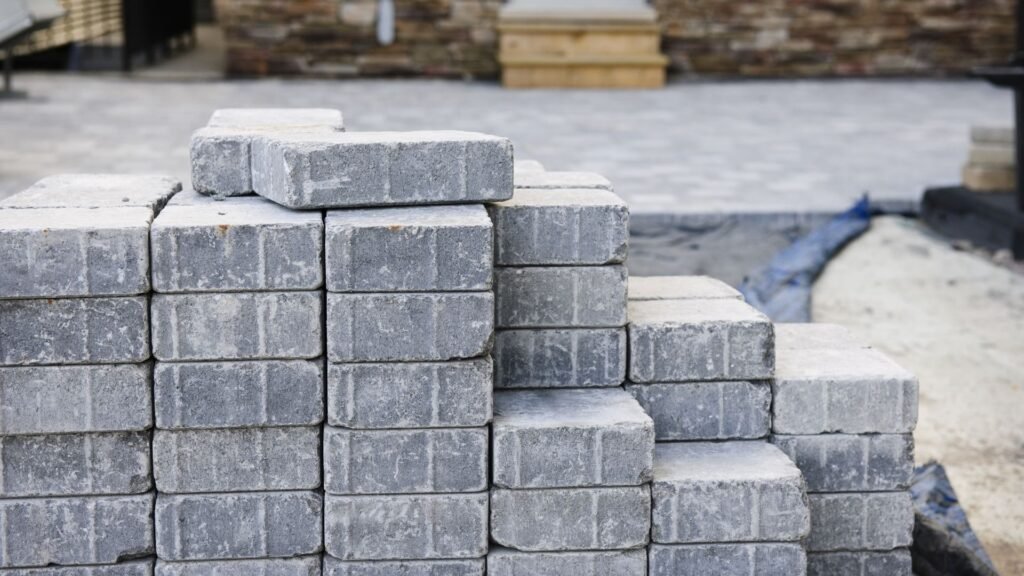
Plain Concrete
Plain concrete is the most basic and affordable option for paving. It’s made from a standard mix of cement, water, and aggregate, and typically has a smooth, grey finish. This type is ideal for driveways, footpaths, and utility areas where function matters more than looks. It provides solid durability and is easy to maintain, which makes it a go-to choice for many Kiwi homeowners who want a low-fuss solution.
Plain concrete is widely available from national suppliers like Firth and Allied Concrete, with local delivery offered across most regions in NZ. It’s also easy to customise later with sealing or resurfacing if you want to refresh its look down the line.
Exposed Aggregate
Exposed aggregate concrete is a popular choice in NZ for outdoor spaces where grip and texture are important. During the finishing process, the top layer of cement paste is removed to expose the natural stones or pebbles in the mix. This creates a slip-resistant surface, making it great for driveways, pool surrounds, and patios.
Its visual appeal also adds character, especially when combined with coloured stones or decorative finishes. Exposed aggregate is available from local suppliers like Atlas Concrete, who offer a range of aggregate styles specific to regional stone types.
Coloured Concrete
Coloured concrete is a practical way to blend your paving with the rest of your landscape or home design. Pigments are added during mixing to achieve a uniform tone throughout the slab. Common colours in New Zealand include charcoal, terracotta, sandstone, and warm greys that suit both modern and traditional homes.
Coloured concrete is UV-stable when sealed properly, and it’s easy to match with other outdoor features like fences, decks, and retaining walls. Suppliers such as PeterFell and Cemix offer a wide colour selection and support local delivery across NZ, including Auckland, Wellington, and Christchurch.
Stamped Or Textured Concrete
Stamped concrete mimics the look of natural materials like stone, brick, or timber, without the higher cost or maintenance. A patterned stamp is pressed into the concrete before it fully sets, creating a decorative surface that’s both strong and stylish. Textured finishes can range from rough-cut stone to wood-grain effects.
This option works well for patios, entryways, and garden paths where visual impact is important. It’s especially useful if you want the look of pavers without the risk of weed growth between gaps. You’ll find a variety of stamp options through NZ-based installers and concrete finishers who offer packages with installation and finishing included.
Permeable Concrete
Permeable concrete is designed to allow water to pass through its surface, reducing runoff and helping with drainage. It’s made using a special mix with fewer fine particles, which leaves interconnected pores throughout the slab. This makes it ideal for driveways, pathways, or areas prone to flooding or pooling.
In regions like Auckland and Hamilton, where heavy rainfall is common, permeable concrete is becoming more popular for both residential and commercial projects. Some councils even encourage its use as part of stormwater management. Companies such as Firth offer permeable concrete options and guidance on meeting local council requirements.
Local Availability Across NZ
Most of the concrete types mentioned above are available nationwide. Firth Industries, Allied Concrete, and Holcim are major suppliers with depots in Northland, Waikato, Bay of Plenty, Wellington, Canterbury, and Otago. Smaller regional companies also provide custom mixes suited to local conditions, including volcanic soils or high-moisture zones. Always check with your local supplier to confirm the best mix and delivery options for your location.
When selecting concrete, it’s not just about the look, it’s about matching the right type to your climate, soil, and use case. That’s how you get paving that lasts for years with minimal fuss.

Choosing The Right Concrete For Your Project
When planning a paving job, picking the right concrete isn’t just about cost. It’s about choosing a mix that fits the purpose, performs well in your environment, and looks the way you want it to. In New Zealand, where weather and ground conditions vary by region, these decisions matter even more. Here’s what you need to think about before locking in a choice.
Load-Bearing Needs
Start by asking how much weight the surface will need to handle. A driveway will carry the weight of vehicles, so it needs stronger, reinforced concrete, usually 100mm to 125mm thick with reinforcement mesh. For light-use areas like patios or garden paths, a 75mm to 100mm slab may be enough. Using the wrong mix for the job can lead to cracks and sinking later on.
Weather And Drainage
New Zealand’s climate ranges from hot, dry summers to wet winters, depending on the region. If you’re in an area that sees a lot of rain or frost, drainage becomes critical. A well-drained base helps prevent water pooling and reduces the risk of concrete shifting or cracking. You might also consider permeable concrete, which allows water to pass through and reduces runoff issues, especially helpful in council-regulated zones.
Budget
Budget will always influence your decision, but cutting corners with concrete can backfire. Plain concrete is the most affordable option, but if you want a specific look or finish, expect to pay more for exposed aggregate or coloured concrete. You also need to factor in base preparation, sealing, and maintenance costs over time. Sometimes it’s better to spend a little more up front to avoid bigger issues down the line.
Aesthetic Preference
Concrete doesn’t have to look bland. With coloured, stamped, or exposed aggregate finishes, you can get a surface that complements your home’s style. A well-finished patio or path can increase your property’s street appeal and create a more inviting outdoor space. Think about the overall vibe you want, modern, rustic, clean, or natural, and pick a finish that supports it.
Is Coloured Concrete Worth It For A Small Patio?
If you’re dealing with a small patio, coloured concrete might seem like an unnecessary expense. But in most cases, it’s worth considering. A subtle tint can make the space feel warmer, more polished, and better suited to the surrounding landscape. It adds personality without needing extra materials or décor. Plus, since patios are visible, the visual return on investment is high, even for small areas.
Choosing the right concrete is about finding a balance between function, appearance, and cost. When you get that balance right, you get a surface that lasts, looks good, and adds real value to your property.

Preparing The Base For Concrete Pavers
Getting the base right is one of the most important steps when laying concrete pavers. A strong, stable base supports the pavers and helps them last for years without shifting, cracking, or sinking. Skipping this step or rushing through it, can lead to uneven surfaces, pooling water, or even structural failure. In short, the base is the foundation, and a good foundation means fewer problems down the line.
The main reason base preparation matters is stability. Without a compact and level base, your concrete may crack or move under pressure. Whether you’re building a driveway or a garden path, the ground underneath must support the weight above it. Drainage is just as important. New Zealand’s weather can be unpredictable, with plenty of rain in some regions. If water isn’t directed away properly, it can soften the soil under your pavers, leading to movement and damage over time.
You’ll typically need three base materials: crushed rock, coarse sand, and compacted soil. Crushed rock forms the bulk of the base. It’s sturdy, locks into place, and allows water to drain through. Sand goes on top of the crushed rock to create a smooth, level surface for the pavers. Compacted soil is the subgrade, the native soil that needs to be firm and stable before any material goes on top. If it’s too soft or full of organic matter, it can shift over time, causing issues with your concrete.
As for depth, most projects in New Zealand need around 100 to 150mm of compacted base material for light loads like walkways or patios. For driveways or areas that support vehicles, aim for 150 to 200mm. Always compact each layer to reduce settling later on. Slope is another key part. Aim for a 1–2% slope away from buildings or structures. This ensures water runs off instead of pooling under or around your concrete.
There are a few common mistakes to avoid. One is skipping the drainage slope. Without it, water can collect and weaken the base. Another is pouring concrete over a soft or unprepared subgrade. It might look fine at first, but over time, the ground will shift and take the concrete with it. Uneven base layers are another issue. If the base isn’t level and properly compacted, your finished surface will reflect those flaws, making the pavers look uneven and feel unstable underfoot.
Taking the time to prepare the base properly sets the entire project up for success. It’s not the most glamorous part of the job, but it’s the one that matters most when it comes to strength, durability, and long-term performance.

Pouring And Laying Concrete For Pavers
Installing concrete for pavers requires careful preparation and the right techniques to get a smooth, long-lasting surface. Whether you’re working on a driveway, patio, or path, following each step properly helps prevent issues like cracking, shifting, or uneven surfaces down the line. Here’s a practical, easy-to-follow guide on how to pour and lay concrete for pavers, especially suited for New Zealand conditions.
Tools And Materials You’ll Need
Before starting, gather the tools and materials you’ll use throughout the process:
- Measuring tape and marking spray
- Shovel and wheelbarrow
- Spirit level or laser level
- Plate compactor or hand tamper
- Reinforcement mesh or rebar (if needed)
- Concrete mixer or ready-mix delivery
- Screed board or straightedge
- Trowel and float
- Edging tools or formwork boards
- Concrete curing compound or plastic sheeting
These tools make the job easier, help achieve an even finish, and reduce the risk of structural problems later on.
Step-By-Step Overview
Mark Out The Area
Start by clearly marking the area you’ll be paving. Use spray paint or string lines to outline the shape. This gives you a visual boundary to work within and helps with accurate excavation. Double-check the dimensions and allow for slight over-excavation on the sides to install formwork.
Excavate And Level
Dig down to the required depth, which includes both the base layer and the concrete slab. A typical depth ranges from 150mm to 250mm, depending on use. Remove all soft soil and organic matter. Use a level to ensure even depth and create a slight slope (1–2%) to allow water to drain away from structures.
Add Base And Compact
Add a compactible base layer, usually crushed rock or gravel, and spread it evenly. Compact it using a plate compactor or hand tamper to create a solid foundation. A well-compacted base reduces the chance of settling or movement over time.
Pour Or Place Concrete
If you’re using ready-mix concrete, schedule delivery in advance. Pour the concrete evenly over the compacted base, starting from one end and working across. Spread the concrete using a shovel or rake, then use a screed board to level it across the top of the formwork. Insert reinforcement mesh or rebar if the area needs extra strength.
Smooth, Shape, And Cure
Once poured, use a trowel or float to smooth the surface and shape the edges. Add expansion joints if the area is large. These joints help control where cracks will form. After shaping, begin the curing process. Spray a curing compound or cover the slab with plastic to keep moisture in. Let it cure slowly over several days to build strength and reduce cracking.
Quick Tip: DIY Or Hire A Pro?
DIY Pros:
- Saves on labour costs
- Flexible schedule
- Personal satisfaction
DIY Cons:
- Physically demanding
- Requires skill and patience
- Mistakes can be costly to fix
Hiring A Pro Pros:
- Quality finish and structural integrity
- Faster turnaround
- Experience with local soil and weather
Hiring A Pro Cons:
- Higher upfront cost
- Limited control over timing
Laying concrete for pavers is doable with the right tools, planning, and attention to detail. If you’re confident and working on a small area, DIY could be a great weekend project. But for driveways, larger patios, or areas with drainage challenges, working with a professional can save time and prevent costly errors.

Sealing And Maintaining Concrete Pavers
Sealing and maintaining your concrete pavers is one of the most overlooked steps in any paving project, but it plays a big role in how long your surface lasts and how good it looks over time. In New Zealand’s climate, where rain, sun, and moss growth are common issues, sealing gives your concrete the added protection it needs.
Why Sealing Helps With Weather, Stains, And Moss
Concrete may seem tough, but it’s a porous material. That means water, oils, and dirt can seep into the surface if left unsealed. In areas that get a lot of rain or humidity, like much of NZ, this can lead to moss, mildew, and even slippery surfaces over time. A quality sealer creates a barrier that keeps moisture out, helps the surface dry faster, and blocks staining from things like leaf litter, tyre marks, or barbecue spills.
Sealing also protects against UV rays, which can cause fading or discolouration, especially if you’ve used coloured or decorative concrete. In short, sealing helps your pavers stay cleaner, safer, and more attractive year-round.
When And How To Seal (Timing, Types Of Sealers)
The best time to seal your concrete pavers is after the surface has fully cured, which usually takes about 28 days after installation. Sealing too soon can trap moisture inside, leading to a cloudy finish or even surface damage.
There are two main types of sealers you’ll find in NZ:
- Penetrating sealers: These soak into the concrete and form a barrier below the surface. They’re great for protecting against moisture and are often used in driveways and high-traffic areas.
- Film-forming sealers: These sit on top of the concrete and provide a glossy or satin finish. They’re ideal for decorative concrete but can become slippery if not applied correctly.
Apply sealer on a dry, mild day, ideally between 10–25°C. Make sure the surface is clean and free of dust, debris, or oil. Use a roller or sprayer for even coverage, and let it dry completely before walking or driving over it.
Simple Maintenance Checklist
To keep your concrete pavers looking sharp and performing well, stick to a basic upkeep routine. Here’s what that looks like:
- Regular cleaning: Sweep often to remove dirt and debris. Use a pressure washer every few months to clear away grime, moss, or mould buildup, especially in shaded or damp areas.
- Resealing every 2–3 years: Sealers don’t last forever. Reapply every few years depending on the wear, especially for driveways or high-traffic zones. You’ll know it’s time when water no longer beads on the surface.
- Watching for cracks: Small cracks can lead to bigger issues if left alone. Inspect the surface every few months and fill any cracks right away to prevent water from seeping in and weakening the base.
Taking the time to seal and maintain your concrete pavers keeps them functional, safe, and great-looking for years. It’s a simple step that goes a long way in protecting your investment.

Common Problems And How To Avoid Them
When installing concrete for pavers in New Zealand, a few common problems can affect the look and durability of your project. These issues often stem from improper base work, weather exposure, or lack of planning. The good news is that most of them are preventable with the right approach. Below are four key problems you might encounter, along with simple steps to avoid them.
- Cracking From Poor Base Or Expansion
Cracks are one of the most frequent issues with concrete paving. They often occur when the base beneath the concrete isn’t compacted properly or when expansion joints are missing. Without a solid base, the ground shifts over time and puts stress on the concrete surface. This leads to visible cracks that get worse with weather changes.- How to prevent it: Always start with a well-compacted base using crushed rock or gravel. Make sure the area is level and stable before pouring concrete. Include expansion joints every 1.5 to 3 meters to allow the concrete to expand and contract without breaking.
- Uneven Pavers From Soil Movement
Uneven surfaces can make a patio or walkway unsafe and unsightly. This problem usually happens when the soil underneath wasn’t compacted properly, or when water erosion shifts the ground. In New Zealand, regions with high rainfall or clay-heavy soil are especially prone to this.- How to prevent it: Excavate to the right depth and use compacted sub-base layers. Avoid laying pavers directly on soft or wet soil. Adding a geotextile fabric between the soil and base material can also help stabilize the ground and prevent movement.
- Water Pooling Or Drainage Issues
Poor drainage can turn your paved area into a mess. Standing water not only damages concrete but also creates slippery surfaces and encourages moss or mold growth. This often happens when there’s no slope or when the surrounding ground pushes water back toward the paved area.- How to prevent it: Ensure your paver area has a slight slope, about 1:100 gradient, for water to drain naturally. Avoid sealing the entire area if you’re using permeable pavers. For solid concrete, consider installing drainage channels or French drains around the edges.
- Colour Fading From UV
Over time, exposure to UV rays can cause coloured or decorative concrete to fade, especially in areas that receive strong sunlight. While this doesn’t affect performance, it does impact appearance.- How to prevent it: Use UV-resistant sealers on coloured or stamped concrete. Reseal the surface every two to three years to maintain the colour and protect against harsh weather. Choose high-quality pigments and finishes from reliable NZ suppliers to ensure longer-lasting results.
By addressing these common problems during the planning and installation phase, you’ll save time, money, and frustration later on. A well-built concrete paver surface not only looks great but also stands up to New Zealand’s weather conditions for years to come.

Cost Of Concrete For Pavers In NZ
When planning any paving project, one of the first questions that comes to mind is, “How much will it cost?” Understanding the cost of concrete for pavers in NZ helps you set a realistic budget and avoid surprises down the line. Whether you’re working on a small patio or a full driveway, knowing the breakdown of expenses can make the process smoother and more manageable.
Average Cost Per Square Metre In NZ
On average, the cost of concrete pavers in New Zealand ranges from $75 to $150 per square metre. This range depends on several factors including the type of concrete, site conditions, the complexity of the job, and who’s doing the work. For standard plain concrete, expect to pay closer to the lower end. Decorative finishes or custom work, like exposed aggregate or coloured concrete, will push the cost higher. According to local trade directories and supplier estimates, these figures reflect current rates across most NZ regions.
What’s Included In The Cost?
There are three main cost components in any concrete paving job:
- Materials: This includes the concrete mix itself, base materials like crushed rock or sand, and any additives.
- Labour: If you’re hiring professionals, labour can make up 30–50% of the total cost. This covers excavation, prep, pouring, leveling, and finishing.
- Tools And Equipment: DIYers should account for tool rental or purchase, such as compactors, screeds, concrete mixers, and safety gear.
Hidden Or Extra Costs To Consider
Beyond the base cost, there are a few extra expenses that are easy to overlook:
- Reinforcement Mesh: Reinforces the concrete to prevent cracking, especially in driveways. This can add $10–$20 per m².
- Sealants: Sealing protects against moisture and stains and typically costs an extra $5–$15 per m².
- Decorative Finishes: Coloured concrete, stamping, or exposed aggregate adds both labour and material costs, expect an additional $20–$50 per m² depending on the style.
Other potential extras may include drainage solutions, formwork, or excavation of rocky soil if the site conditions are difficult.
Sample Budget Estimates
To help you picture the real cost, here are two practical examples based on typical NZ prices:
- Small Driveway (20 m²):
Using exposed aggregate with reinforcement and sealing:- Base cost (at $120/m²): $2,400
- Reinforcement mesh (at $15/m²): $300
- Sealant (at $10/m²): $200
Total estimated cost: $2,900
- Small Patio (10 m²):
Using coloured concrete with basic sealing:- Base cost (at $90/m²): $900
- Sealant (at $10/m²): $100
Total estimated cost: $1,000
Keep in mind these are estimates. Local rates, site prep needs, and custom design requests can shift the final price up or down. Getting quotes from local NZ contractors will give you the most accurate number for your project.
If you’re working with a limited budget, consider starting small or choosing simpler finishes that still look great but cost less. Planning ahead and understanding each cost factor ensures your concrete paving project runs on time, within budget, and without stress.

Tips From NZ Locals & Builders
When it comes to working with concrete for pavers in New Zealand, nothing beats the advice of those who’ve done it themselves. Local builders and experienced homeowners know what works and what doesn’t, especially when dealing with New Zealand’s unique climate and ground conditions. Here are a few practical tips and insights gathered from tradies and Kiwi DIYers who’ve tackled concrete paving jobs across the country.
One homeowner in Canterbury shared that they underestimated the importance of base preparation. “We thought compacting the soil was enough, but a heavy rain softened everything and caused the pavers to sink in places. After lifting and redoing the base with crushed rock, everything stayed level.” Their takeaway? Always invest time in a proper, stable base, especially if your property sits on soft or uneven ground.
A builder from Hamilton mentioned that concrete mixes should vary by project type. “Don’t just grab any mix from the store. For driveways, use one with higher strength and proper reinforcement. For garden paths, you can go lighter. Match the mix to what the surface will be used for. It saves you problems later.”
Another tip comes from a paving contractor in Auckland who emphasized timing. “Pouring concrete in the middle of summer is risky because it dries too fast and can crack. Late spring and early autumn are ideal months. There’s less heat, but you still get consistent curing without delays from rain or frost.”
Local conditions across NZ vary, and that affects how you should approach concrete work. In southern areas like Otago, frost can be a major concern. You’ll need to use air-entrained concrete to resist freeze-thaw damage and avoid pouring during frosty mornings. In contrast, regions like the Northland get high rainfall, so you need to ensure proper drainage and avoid water pooling under your pavers. Wet ground can destabilize the base and lead to shifting or cracks.
The most consistent advice? Plan around your climate and don’t rush the prep work. Whether you’re in a dry inland area or near the coast, taking the time to understand your soil, drainage, and seasonal timing can make a big difference in how long your concrete pavers last.
Ready to start your concrete paving project? Visit Concrete Driveways Auckland to explore paving solutions, get expert advice, or book a free quote. We’re here to help you build it right from the ground up.

FAQs: About Best Concrete For Pavers In NZ
What type of concrete is best for pavers in New Zealand?
Exposed aggregate and coloured concrete are popular for their durability and appearance. Plain concrete is cost-effective for basic paving jobs.
Can I use ready-mix concrete for paving projects?
Yes, ready-mix concrete is convenient and consistent in quality. It’s ideal for small to medium paving projects, including patios and walkways.
How thick should concrete be for pavers?
For driveways, concrete should be 100–125mm thick. For patios and garden paths, 75–100mm is generally sufficient.
Do I need to seal concrete pavers?
Sealing helps protect against moisture, stains, and UV damage. It’s recommended to seal concrete pavers every 2–3 years for best results.
How long does concrete take to cure before I can use it?
Concrete typically cures in 24–48 hours for light foot traffic, but full strength is reached after 28 days. Avoid heavy loads during this period.
What’s the average cost of concrete for pavers in NZ?
Expect to pay between $75 to $150 per m², depending on the concrete type, site prep, and whether you’re hiring a contractor.
Can I install concrete pavers myself?
Yes, but proper base preparation, leveling, and curing are critical. DIY is doable for small areas, but complex jobs may need a professional.
How do I prevent concrete from cracking over time?
Use a solid base, proper drainage, control joints, and reinforcement mesh. Avoid pouring during extreme weather conditions.
Is concrete suitable for all weather conditions in NZ?
Concrete performs well in NZ’s climate when installed correctly. Sealing and good drainage help it resist frost, rain, and UV exposure.
What’s the difference between poured concrete and pavers?
Poured concrete is a continuous slab, while pavers are individual units laid over a base. Pavers allow more flexibility but may shift over time if not installed properly.
Conclusion
Concrete is a reliable and long-lasting option for paving projects in New Zealand, offering strength, versatility, and value for both residential and outdoor spaces. Whether you’re planning a new driveway, patio, or garden path, choosing the right type of concrete and preparing the base properly can make a noticeable difference in durability and appearance. Take the time to plan your project, compare concrete options like exposed aggregate or coloured finishes, and ensure the ground is well-prepped for drainage and support. If you’re unsure where to start or need help getting it done right, reach out to a local contractor or begin sketching your ideas based on your space, budget, and needs.